The Reality of Market Liquidity and Institutional Scale
Do you know how much money is traded in the daily market? I am not talking about thousands or tens of thousands: neither lakhs nor crores. I am referring to thousands of crores, sometimes lakhs of crores. This is not a joke or a game; it is a highly structured, professionally designed, systematic process where every dollar is invested carefully.
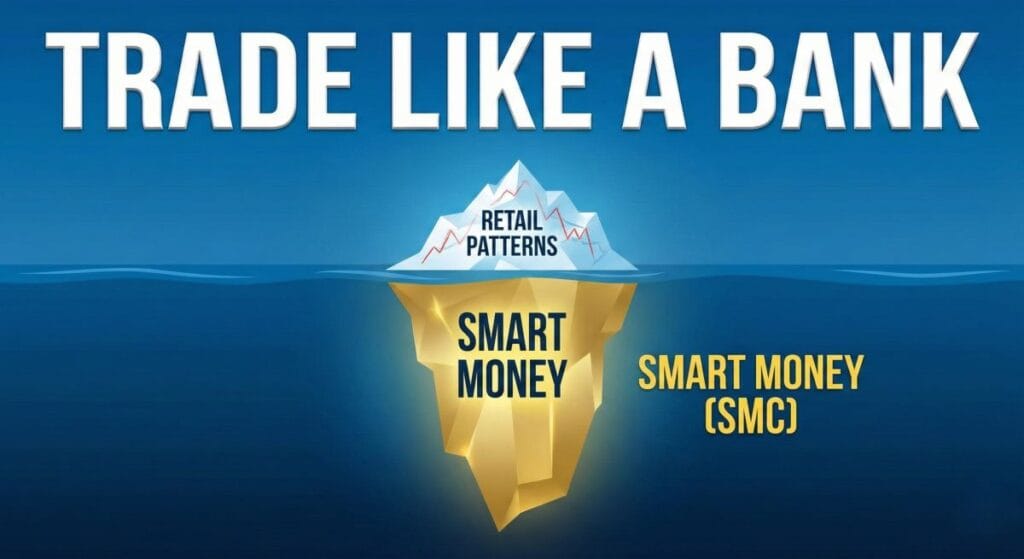
Now ask yourself: Will anyone trade such a large amount—thousands, crores, billions of rupees—by looking at support resistance, trend lines, or MACD? Not at all. There are players in this market—operators, significant players, banks, institutions, hedge funds, FIIs, and DIIs—who play by different rules.
Their data, information, and thinking are different. These people see what ordinary traders cannot see. In fact, these people do not control the market; the market moves according to them.
If you are still trading what everyone else is doing—changing indicators or learning new patterns—you will not become rich. If that were the case, every other Indian trader would be a millionaire.
But 90% of people fail because they trade on surface-level knowledge, which is meant only to be seen, not understood. It is time to look behind that curtain where real money is made and where Smart Money works. This structure is the Smart Money Concept (SMC).
Why Retail Patterns Fail: The Liquidity Trap
Let’s talk about a simple but common concept: the “W” pattern. You have likely heard that when the W pattern forms and the neckline is crossed, you should buy with a slight stop-loss to hit a significant target. This is nonsense. I am not saying the W pattern does not work—of course it does, but not every time.
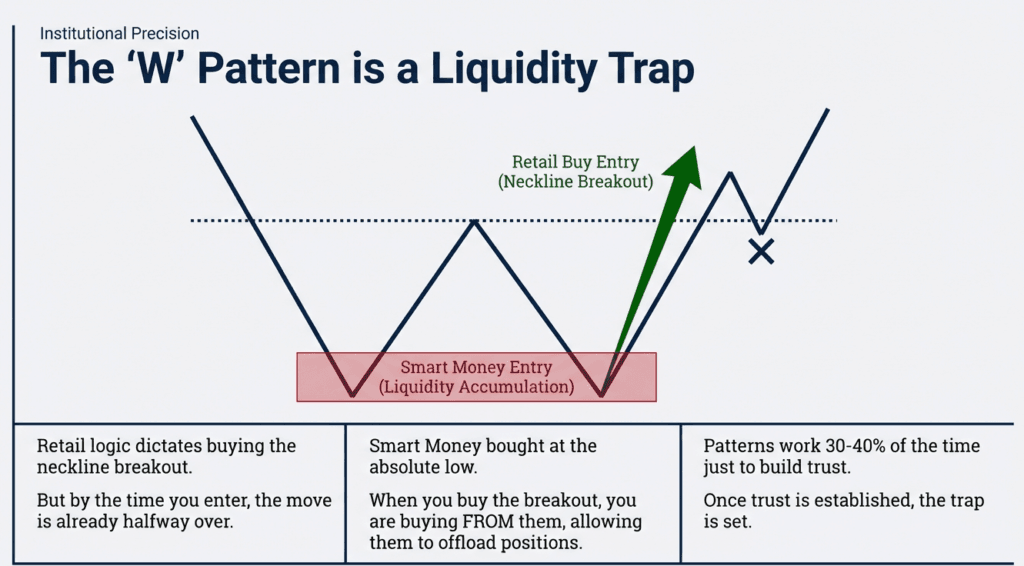
When the W pattern forms and you are told to buy as the neckline crosses, have you ever thought about where Smart Money bought? In fact, buying starts where the market made its low. You are taught to buy when the neckline breaks, which means you are buying at the place where the big players have already made their positions. As soon as you enter, a small spike comes, your stop loss (SL) hits, and you are out of the market.
The W pattern works, but only when the retail trader trusts it. If this pattern continues to fail, people will stop trusting it, and big players will not be able to trap anyone. That is why the W pattern has to work 3 or 4 times out of 10—to build trust so you don’t get trapped the next time.
The Mechanics of the “Big Player”
What do the big players want? They want you to see the W pattern, the M pattern, the head-and-shoulders pattern, and the trend lines. When lakhs of retail traders look at the same thing, a crowd forms, and that crowd creates liquidity.
Liquidity is the fuel that enables the market to move. When thousands of retailers place buy and sell orders at the same place, a “liquidity pool” is created. When a big player enters the market, they never trade with small amounts; they trade with massive capital.
If they placed such large orders directly into the market, the price would move sharply, undermining their entry. They need liquidity zones—places where many people are already standing ready to buy or sell—to fill their orders.
These liquidity zones are the very places we are taught to trade: double tops, double bottoms, breakouts, trendlines, and support and resistance levels.
Big players create these venues themselves to generate orders and use our positions to execute their massive trades. We believe we have taken an entry on a breakout, but in fact, we have provided liquidity to the big players.
Big players like FIIs, DIIs, hedge funds, and big banks cannot place orders of 10,000 crores or 1 lakh crores in a single click. Instead, they create a zone—an area in the market where you get confused, known as a sideways or liquidity trap zone. In this zone, some people buy expecting a breakout, while others sell expecting a market decline. When stop-losses are triggered across the board and capital is locked in, large traders place large orders there. Then, the market moves in the direction of their position.
The Technical Foundation: Dow Theory and Market Structure
The Smart Money Concept is not entirely new; it comes from Dow Theory. Dow, often considered the father of technical analysis, introduced the theory that when a price moves in a trend, it creates a pattern.
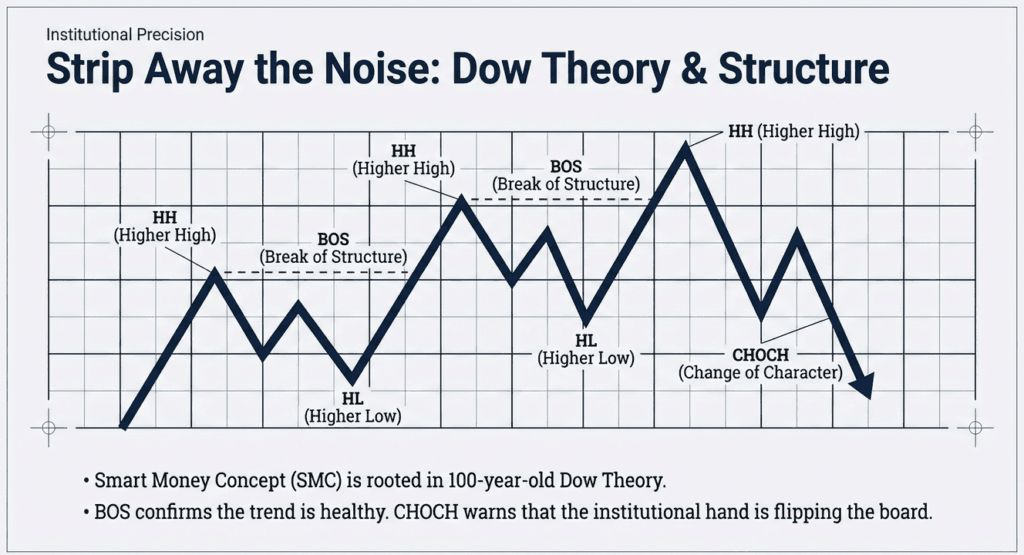
According to Dow Theory, prices never move straight up; they move in a pattern of Higher Highs and Higher Lows.
- First, the price makes a low, then puts in a high.
- When the price retraces, it sets a Higher Low.
- When the price breaks the previous high, it sets a new high, which we call a Higher High.
- The price will retrace downward, but at any cost, it will not break the previous low.
In SMC, we use specific definitions for these structural movements:
- BOS (Break of Structure): When the price breaks a high in an uptrend, we call this a Break of Structure. Forming a BOS confirms that the price is in an ongoing uptrend and has not yet changed character.
- CHOCH (Change of Character): If the price comes below the previous higher low and the candle closes there, this is called a Change of Character. This indicates that the uptrend has changed character and is poised to move into a new trend.
Precision Market Mapping with Heiken Ashi
It can often be difficult to mark a trend clearly due to market noise. To solve this, we can use Heiken Ashi Candlesticks. The primary reason for using Heiken Ashi is that it reduces noise, enabling more accurate structural identification.
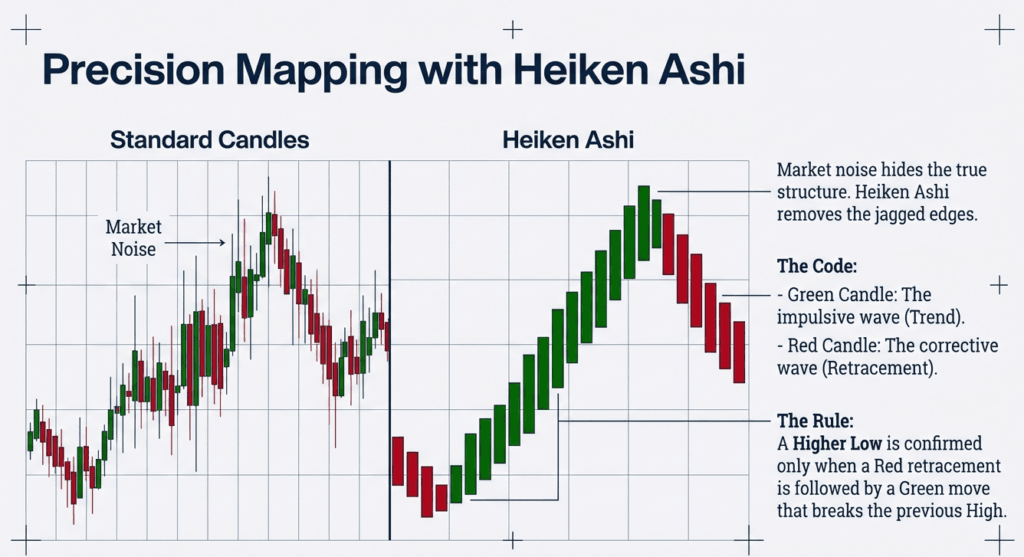
We keep a simple concept here:
- Green Candle: Represents a trend or a wave of an uptrend.
- Red Candle: Represents a retracement.
Higher Lows are formed on the Red Candle’s low, and Higher Highs are formed on the Green Candle’s high.
To mark the trend:
- Identify a relevant low point.
- Follow the Green Candle to the high point.
- When a Red Candle appears, wait to see if subsequent red candles appear. The low of this retracement is the Higher Low.
- This structure is valid only when a Green Candle breaks the previous high.
The SMC Trading Strategy: From Setup to Execution
Identifying the Demand Zone
Our strategy revolves around the Change of Character (CHOCH). Imagine we see a pattern of higher highs and higher lows. The price sets a higher high, then breaks the higher low, showing that the character has changed. However, it then traps people and sets a new high.
Most traders would go short on a breakdown, but if the market reverses and forms a V-shape to set a new high, we must identify the source of that move. We mark the last red candle before the upward move as our Demand Zone. Whenever the price comes back to this zone, we look to buy.
Refining Entry with Fibonacci
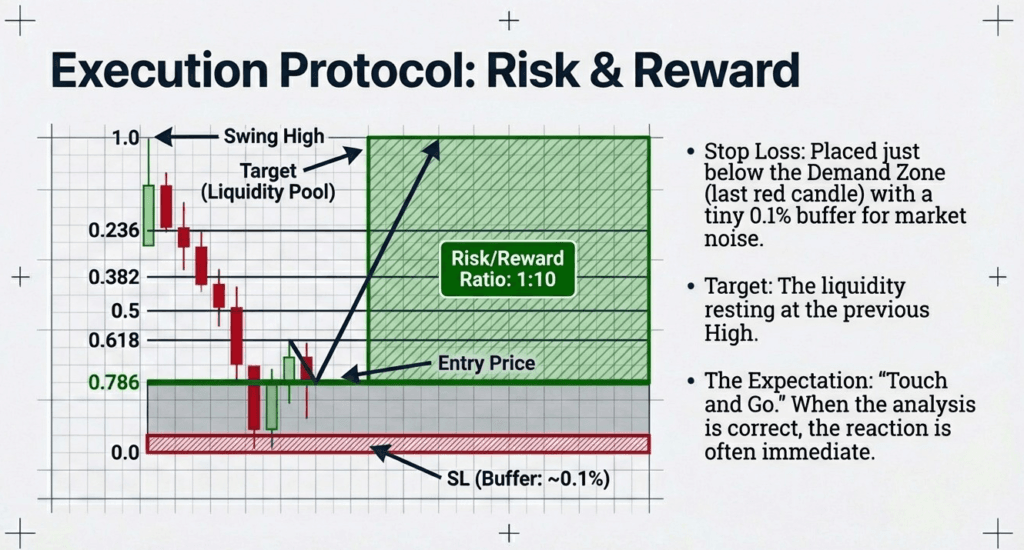
The last red candle can be large, so to refine our entry, we use the Fibonacci tool. We draw the Fibonacci retracement from the low to the high of the move. We specifically look for the 0.786 level. If the price hits 0.786 within our demand zone, we consider it a prime buying opportunity.
Managing Risk and Time Symmetry
- Stop Loss (SL): We place the SL just below the last red candle (the demand zone) with a small buffer of roughly 0.1%. This ensures the SL is very small.
- Target: We target the previous high from where the price fell.
- Touch and Go: Often, the price comes down, touches the zone, and shoots up immediately—a “touch and go” situation.
- Time Symmetry: A practical observation is the relationship between the time it takes for the price to fall and the time it takes to recover. Often, the recovery is faster. If the price took a certain amount of time to come down, it may take half that time to go back up. For example, if the price fell by 2 hours, it might rise by 1 hour.
Advanced Institutional Dynamics: The Fair Value Gap (FVG)
To enhance trade, we apply the Fair Value Gap (FVG) concept. This is a universal and critical component of SMC.
An FVG is identified using a three-candle sequence:
- Candle 1: We mark the high of the first candle.
- Candle 2: This is the large move candle in the middle.
- Candle 3: We mark the low of the third candle.
The gap between the high of Candle 1 and the low of Candle 3 is the Fair Value Gap.
FVGs are formed because of pending orders and institutional activity. When smart money buys in bulk—say, 10,000 crores—they place limit orders. If buying is fast and aggressive, prices rise, leaving some of their lower-priced orders unexecuted.
Once the price returns to this level, pending orders are executed. This triggers a momentum burst as buying accelerates and many retail Stop Losses are triggered, fueling the move further.
Institutions know that traders can see the Fair Value Gap, so they use it to their advantage. Sometimes the price will enter the FVG, trap traders, and then dip lower. Therefore, the most high-probability setup is to find a Demand Zone below the Fair Value Gap.
If the price fills the FVG and taps into the Demand Zone located just beneath it, the probability of the trade increases significantly. This aligns with the institutional goal of “buying low”.
Nothing in the market is permanent; it is dynamic. However, by understanding these structures—Liquidity, Demand Zones, and Fair Value Gaps—you move from trading patterns to the “why” behind price movements.

